Welcome to my blog! I'm Sari, a mother of a 2 year old girl and 7 year old boy/girl twins. I started this blog 6 years ago when I started using cloth diapers. If you scroll back to the earlier posts, you can see my learning adventure with the twins, there's a lot of really helpful information if you are interested in cloth diapers. I hope that this can be a valuable source of information for other moms contemplating making the switch to cloth diapers and/or making their own diapers.

Now I'm using this as more of a general "mom blog". I'm crafty, I like to bake and I'm currently a group fitness instructor and a Beachbody coach. I may plug my own business every so often (click here!), but I will expand my topics to cover basically anything that I feel like writing about - experiences I have or products that I think deserve a review (both good and bad). If I'm getting paid or benefiting in any way then that will be mentioned in the post.

Do you have a product that you would like me to try and review? Send me an email

Thursday, May 28, 2009

BSRB Feeding Frenzy

If you CD then you know about BSRBs. I mentioned them in an earlier post when I described fitted diapers. BSRB stands for Bagshot Row Bamboo, which is the brand name of a VERY popular one size fitted diaper. It's made entirely out of bamboo / organic cotton. I've heard that it's the ultimate in softness. At $20 a pop, it's not the cheapest, especially considering that they don't even have their own closure system. You are supposed to close them with a snappi or pins.

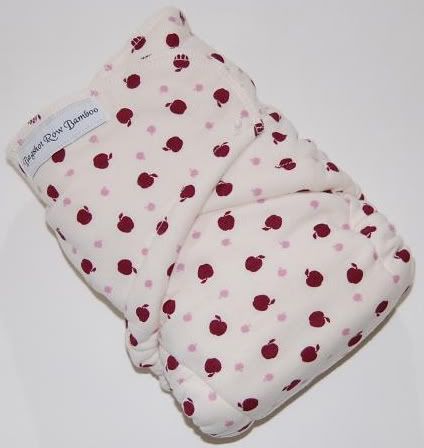
So here's the deal... she restocks on Thursdays and they go on sale at 7:02pm eastern. This means you basically have to sit there and press refresh and pray that your click goes through. I picked my diaper - a cute one with apples on it (one of the twins' favorite words) - and waited until it was time. Hyena Cart has this handy time telling tool that tells you exactly what time it is, down to the second. I started getting nervous at 7:01:42. Why was I so nervous? You'd think that with the amount of adrenaline pumping through my veins and the rate my heart was beating that I was waiting to see if I won the Oscar I'd been nominated for.

Suddenly the screne changes. There is now a "buy" button that I can click! I click... it's in my cart... well, that wasn't so hard. I proceed to checkout, pay for my goods ($23 when you add in shipping) and go back to stare at my newly purchased diaper. It's awfully cute. Too bad it's not waterproof and I'm going to have to cover up that cuteness with a PUL cover. Oh well, it's all in the name of research, right?

I'll put up a review when the diaper arrives. Keep checking back as I plan on added more pictures and videos to help people learn about the different kinds of diapers that I'm reviewing.

Check out my new diaper. If you click on the image it will take you to the BSRB website:


Friday, May 15, 2009

Happy Heinys Pocket ~ Review

What can I say, I'm not a fan. The Aplix tabs are HUGE and wide, and STIFF. They aren't comfortable next to my daughter's belly. Otherwise the diaper is fine, similar to FB and BG pockets, but I probably won't be buying any more of them.

Update 6/4/09: I was able to examine a well-loved HH diaper at a friend's house tonight and I think I know what part of the problem is with my HH. My HH is made out of a cotton woven PUL fabric. This makes it much stiffer than a polyester knit PUL that is more comonly used as a diaper outer. The polyester knit PUL HH (super cute cow print) was much softer. The aplix tabs are still huge, but I think the fabric might be the bigger issue.

Update 6/26/09: There's another problem with the cotton PUL. It wicks. Wicking occurs when the outside fabric of a diaper pulls moisture from the inside of the diaper. So when my daughter pees in her HH, the fleece gets a little wet around the leg holes. Then the cotton from the outer fabric draws the wetness out, despite the waterproof PUL lining. Suffice it to say, I will NOT be buying any cotton PUL diapers or fabric. Unless it's really cute... REALLY cute. Cuteness can trump the wicking factor.

gDiaper ~ Review

I think that the gDiapers might be my favorite cloth diapers of all. BUT, I'm not a big fan of the disposable / flushable inserts. They are more expensive than disposable diapers and they bunch up inside the diaper after they get peed on. I like the idea of how you can flush them and love that they don't sit around in land fills for 500 years, but the execution needs some work.

So why are gDiapers my favorite? I LOVE LOVE LOVE using them with an infant prefold for an insert. You just fold it in thirds and plop it into the gDiaper liner and voila. It's nice and trim and seems to be quite comfortable. Top it off with an Imse Vimse liner (I've been using this on all the diapers, actually) and it's like cloth diaper perfection. I use the unbleached Indian prefolds that I bought from Cotton Babies. The infant size is only $1.50!

Bum Genius Organic AIO ~ Review

The BG organic AIO has snaps. It's really kind of an AIO, AI2 hybrid because the absorbant layers are on top of the inner lining, but sewn down at both ends so you can't remove it. I guess this helps it dry faster. I had read that you need to wash the organic diapers several times in order for them to be absorbent, but I tried it after only one washing (in hot water) and was pleasantly surprised at how much pee it held. We've only used it the one time so far, but I have high hopes for this diaper! I like the idea of organic cotton next to my babies' bums instead of synthetic polyester. I just don't know how comfortable it is for them when it's wet. No complaints so far!

6/26/09 Update: I am still loving this diaper. It is super absorbent and very trim. It's even great for naps and possible overnight (still haven't tried it overnight). The only down side to this diaper is that it's on the small side. It's perfect for my 22-23 lb son, but it's a bit snug on my 27ish pound daughter. They both have thin thighs (no rolls) so that helps with the fit. I would NOT recommend this diaper for a baby with thick chubby thighs. I think BG should come out with a larger size option because the diaper really is fabulous. Oh, one more down side... It's $24.95. I wish it were cheaper!

FuzziBunz Pocket ~ Review

I bought 4 FuzziBunz pockets, size Medium, not the one size. I had heard they ran big so Medium seemed to be the way to go. They had a very similar fit to the one-size BG 3.0s. One of my FuzziBunz arrived with a pull in the fabric and a small hole near one of the snaps. I filled out the online form to get it replaced and they sent me an email with instructions on how to send it back. I was annoyed that they didn't mention anything about reimbursing me for shipping costs so I sent an email back to them. They then offered to replace the diaper without me having to send back the damaged FB! A+++ for customer service. The replacement diaper arrived yesterday so it was like getting the slightly damaged diaper for free.

The FB itself seems more comfortable around the leg openings. Plus, the snaps are pretty much baby proof. Neither of my twins even tried to undo the snaps. I had one leak with the FB on my daughter, but I think that was my fault for not changing it quickly enough. It's so much easier to tell when a disposable diaper is wet because they get all squishy. With cloth, I'm never quite sure when they need to be changed.  Check out FuzziBunz here!

Bum Genius 3.0 One Size Pocket - Review

I bought 2 of these diapers, one blue and one pink, both the limited edition with the fleece insides. I do not believe that they are true one size diapers. They fit well on both of my twins on the largest setting. My son is about 22 pounds and 31.5 inches. My daughter is about 25 pounds and 32.5 inches. Both are pretty slender and do not have chunky thighs. I have no idea how this diaper would fit a child of 30 lbs plus, but I guess it's possible if they just get taller and don't necessarily get chunkier.

I imagine that you could fit this diaper on a newborn, but it would be seriously bulky. Both diapers came with two microfiber inserts, one large one with snaps to make it smaller, and one smaller infant sized insert. In the mornings I use both inserts with my daughter because she is a super soaker in the mornings. In the afternoon I would just use the larger insert. On my son, I use the larger insert, but sometimes I snap the end of it so that there is extra padding in the front. I haven't had a single leak with these diapers. I also have not worn them out of the house or during naps or overnight yet.

The Aplix hasn't been a problem. The first time I put them on they both tried to undo them, but since then they have lost interest. I've heard that it doesn't hold up too well after multiple washings, but so far we're OK. I've only washed them a handful of times though.

Update 6/26/09: The aplix is still holding up well. Bum Genius has changed their washing instructions and now recommend that you line dry their diapers. I guess people were having problems with the dryer ruining the aplix. I still put mine in the dryer (on low) and my aplix looks like new. However, I was having some stink issues with the BG fleece. I couldn't get the pee smell out of the fleece no matter how many times I rinsed it and washed it, unless I scrubbed them by hand in the sink, which was not fun. After much googling and frustration I finally added a small scoop of oxyclean to my 17 minute pre-wash (no detergent). Then I ran a regular cycle with an extra rinse (another 40 minutes) and the diapers came out smelling quite fresh!

Thursday, May 7, 2009

Check out my STASH!

We've got... 4 FuzziBunz medium pockets on the left, 2 Thirsties medium covers on the top in the middle, followed by 1 medium Bummis Super Whisper Wrap and 2 medium gDiaper covers. On the right we have 2 one-size Bum Genius 3.0 pockets, 1 one-size organic Bum Genius AIO, and 1 large Happy Heinys pocket. They are ready for the wash! I should be able to try them out on the babies either this afternoon or tomorrow. Bye-bye disposables!

And here are my (unwashed) unbleached Indian pre-folds. We have four regular size on the left and four infant size on the right. The infant size can be used to stuff pocket diapers (and gDiapers). I'm told that they don't quilt up until you wash them. You also need to wash them several times in HOT water in order to get them up to their full absorbency. I'll have to do this with the organic BG as well. This is because the cotton has natural oils that need to be washed away in order to become more absorbent.

Wednesday, May 6, 2009

I made my first diaper!

Yesterday I made my very first cloth diaper. It's a fitted diaper made out of an old pair of flannel pajama bottoms from the Gap. The elastic was shot so it was a prime candidate for the metamorphosis. Check it out:

I took pictures of each step so that I could share how I made my diaper. Since I may want to make diapers to sell in the future (after I've perfected my craft, of course) I wanted to make my own pattern. I started with a Huggies size 4 diaper since that's what my twins are wearing right now. I folded some paper in half and traced the outline of the diaper. I also had to cut the elastic in the diaper to get it to lie straight.

Then I removed the diaper and smoothed out the lines. I opened up the paper and lay the diaper inside to see how the shape looked. I made sure to keep in mind that I would need about a 3/8" seem allowance around the entire thing.

Here are the flannel pants that I have chosen to recycle.

Next, I cut out three layers of flannel using the pattern (folded in half to achieve the best symmetry). You need one layer for the outside of the diaper, one layer for the inside, and a third layer between the two that will be hidden. The hidden layer is the one that you sew your absorbent layers to.

I'm not thrilled with the pattern I created to make my absorbent pad. I think it's oddly shaped and nothing like I've seen on other diaper making sites. But the good news is that this layer will be hidden so no one will see it anyway. I cut two layers of flannel and one layer of zorb. The zorb is pinned between the two flannel layers. I used a zig-zag stitch and went around the entire thing. If you have a serger, you can serge this. I don't have a serger (yet).

After you zig-zag or serge your soaker, it needs to be sewn to the hidden layer of fabric. I pinned it down and sewed a straight line close to the edge.

With the hidden layer complete, the diaper was now ready to be sewn together. This flannel didn't really have a right side because both sides look exactly the same. If there were a right side, I would have put them right sides together for this step. So the top layer would be the outer diaper fabric, then the inner diaper fabric, and then the hidden layer with the soaker facing in. I could have had the soaker facing out, but then I would have had to switch places with my inner & outer fabric. I'm going to try that next time to see if it makes a difference. I think it makes a difference if you are sewing your elastic down (rather than make a casing like I did).

Then I sewed around the entire permiter with about a 3/8" seem allowance (slightly larger than the 1/4" elastic that I used in the next step).

I sort of guessed where the elastic should go (again, using my Huggies as an example) and tacked it down with pins, then sewed it into the seam allowance by going backwards and forwards with a zig-zag. I cut about 5.5" for the back and 5" for the legs. I'm estimating this fitted diaper to be a size medium.

At this point, the diaper was ready to be turned inside out. Et voila! Now the layers were in their proper places. I took this picture before I stuck my hands in and smoothed out the edges. I also snipped the curves and cut the corners prior to doing this, you know, all that good sewing 101 jazz. I could have also used an iron since there's no PUL in this diaper... but I didn't.

After smoothing out the edges I turned in the open part at the front of the diaper and pinned it closed. I was now ready to top stich the entire diaper and make the casings for my elastic. I should point out that after doing this I realized that this front part of my diaper was too high. I ended up cutting off almost a full inch of what you see in this picture. I'll have to adjust my pattern accordingly. The wings in front are also a little on the long side, which would be good if this were a side snap diaper... but it's not. When I got to the elastic, I just pushed it towards the outer edge and held it flat to create the casing.

Here is my daughter, Taylor, modeling the finished product. I secured it with a Snappi for now, but I'm going to test out my new snap pliers and put some snaps on this diaper soon. It was my first time using a Snappi and I couldn't quite get the one that goes down to the crotch to attach properly. My model did not want to sit still long enough for me to figure it out.


I should add that I have no idea how absorbent this diaper is because Taylor did not pee in it. She only wore it for about half an hour and it was dry when I took it off.